


Broadcast Live -How to livestream
How to Live Stream on Youtube and Facebook
Requirements:
- You need to be eligible for mobile livestreaming. Check this link!
- To live stream your mobile device screen, your device must be running Android version 6.0 or later.
Start live streaming your screen
- At the top of the YouTube app, tap Capture
.
- Tap GO LIVE.
- Tap ALLOW ACCESS. This lets YouTube use your camera, mic, and location.
- In the dialog that opens, tap Allow to let YouTube use your location.
- Tap Create Channel.
- At the top right of the screen, tap the
phone icon to stream your phone’s screen.
- Create a title, then select a privacy setting and game title.
- Optional: select More options.
- Add a description
- Schedule for later
- Tap Advanced settings to:
- Turn on or turn off live chat.
- Turn on or turn off age restriction for your stream.
- Indicate whether your stream contains paid promotions and add a paid promotion disclosure.
- Turn on or turn off monetization.
- Select Next to set your thumbnail and screen orientation.
- Tap Next to finish setup.
- A toolbar will show up at the top of your screen, allowing you to control the stream.
- Hit GO LIVE button to start. A 3 second countdown animation will show before your stream starts.
- “You are live” will stick for 3 seconds before fading off screen.
Control or end your live stream
To show the toolbar, tap the picture-in-picture view of your front-facing camera. You can use this toolbar throughout the stream to:
- Pause the stream
- Mute your microphone or front-facing camera
- Change the size of your camera picture-in-picture
- Open live chat
- Stop the live stream
FACEBOOK LIVE
- Tap the camera icon to the left of your search bar.
- Give Facebook access to your camera and microphone when prompted.
- Switch to “Live” on the bottom of your camera screen.
- Choose your privacy and posting settings.
- Write a compelling description.
- Tag friends, choose your location, or add an activity.
- Set your camera’s orientation.
- Add lenses, filters, or writing and drawing to your video.
- Click the blue “Start Live Video” button to start broadcasting.
- Interact with viewers and commenters.
- Click “Finish” to end the broadcast.
- Post your reply and save the video to your camera roll.
1. Tap the camera icon to the left of your search bar.
Open your Facebook mobile app and visit your News Feed. You’ll see a camera icon to the left of your search bar — tap it to open your camera. You’ll have to give Facebook permission to access your mobile device’s camera and microphone in order to go live.
![]()
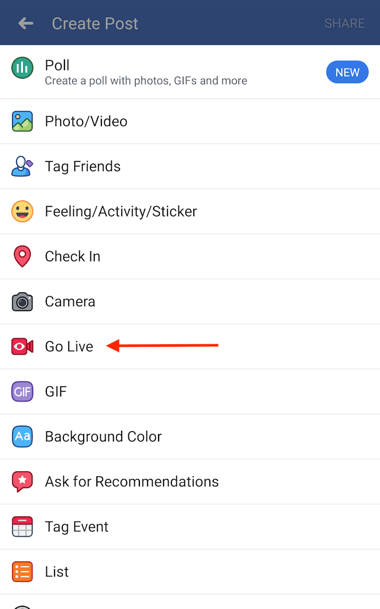
You can also go live on your own Facebook profile. Open up the status bar by tapping the text that reads “What’s on your mind?” Then, select the “Go Live” option from the menu, as shown below.
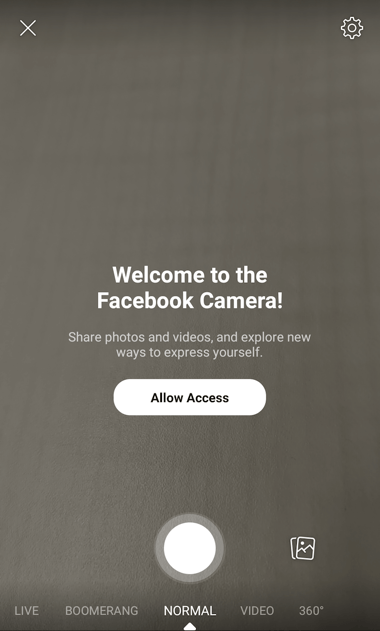
2. Give Facebook access to your camera and microphone when prompted.
You’ll stop receiving these prompts after the first time you use it.

Once you permit Facebook to use your mobile camera, you’ll be asked to permit use of your phone’s camera content, as shown below. This will trigger your ability to switch from using your rear-facing camera to your front-facing camera — options that will come into play in step 7 of this guide.
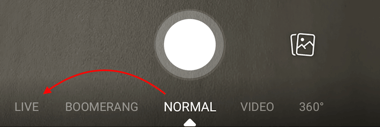
3. Switch to “Live” on the bottom of your camera screen.
Once you’ve given Facebook access to your mobile device’s camera and microphone, you’ll be ready to shoot. However, your Facebook camera defaults to non-live photo shooting when you open it.
To switch your Facebook camera to live video, look to the bottom of your screen for the various types of visual content you can create. On the far left, as shown below, you’ll see the setting, “LIVE.” Tap it once. (Don’t worry, you won’t go live right away.)
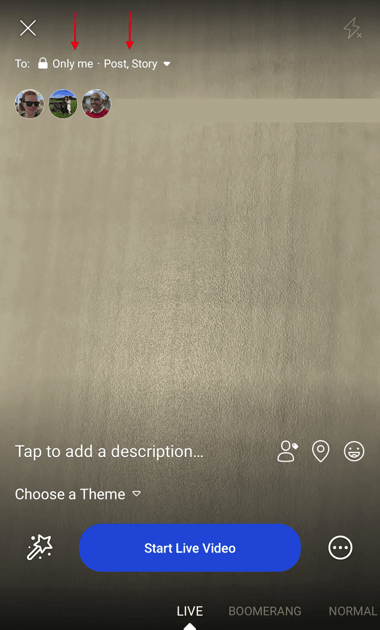
4. Choose your privacy and posting settings.
In the screenshot below, see how Facebook Live is set to “Only me” and “Post, Story” at the top of the screen? This means only I can see the live video — none of my Facebook friends or followers can — but it’s set to post the video as a regular Facebook post and as a Facebook Story if I want it to. You can change these settings by tapping on them.
If you’re posting for a brand, you’ll probably want to make it public so it can reach everyone in your audience who’s currently on Facebook. If you’re posting as yourself, you might want to reserve your broadcast for friends — and then set where you want to post this video, as shown below.
But if you’re new to Facebook Live and want to test it out first, or want to prepare your shot before going live, switch your video’s privacy setting to “Only Me.” You can find the “Only me” option by clicking “See More” and tapping the last bubble, per the following screenshot.
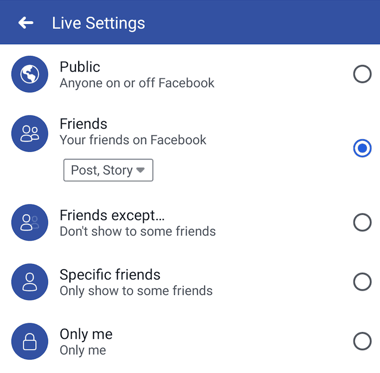
You might also see options to post your live video only to users in specific networks, such as a college or association you belong to. These options will appear below the “Only me” privacy setting.
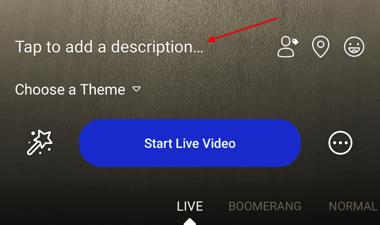
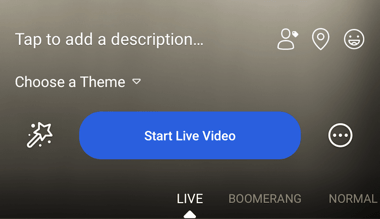
5. Write a compelling description.
Give your broadcast a description, which will show up on people’s News Feeds like a status update above the video. To get people to tune in, write an attention-grabbing headline and help them understand what your broadcast is about.

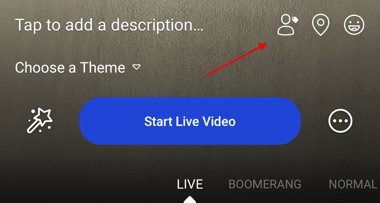
6. Tag friends, choose your location, or add an activity.
Tap the icons at the bottom of your screen to tag people who are in the Facebook Live video, add the location from where you’re shooting, or share what you’re doing in the broadcast. These touches can add more personalization to your video, increase discoverability, and make people want to tune in.
7. Set your camera’s orientation.
Before you click “Start Live Video,” be sure your camera is pointing in the direction you want it to point. In other words, do you want to go live with your front-facing camera lens, or your rear-facing camera lens?
The background of your setup screen will show you what your camera sees. If you want to change the camera view to selfie or vice versa, simply click the rotating arrows icon in the upper-righthand corner of your screen, as shown below.
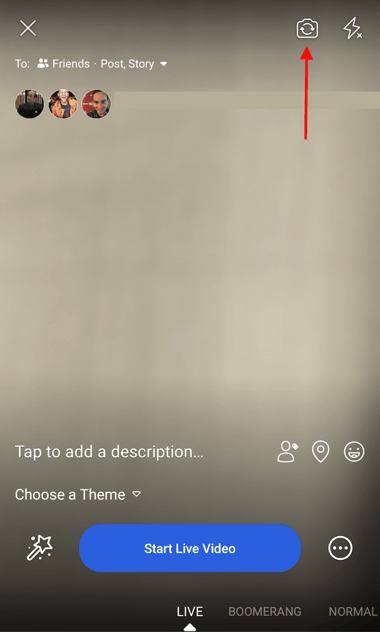
The video will be a square, so it doesn’t matter whether you hold your mobile device vertically or horizontally.
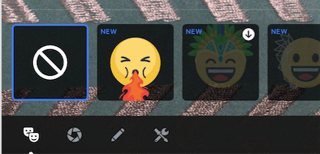
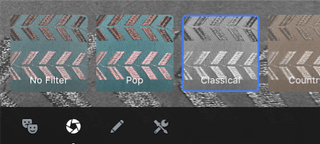
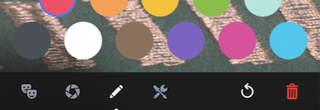
8. Add lenses, filters, or writing and drawing to your video.
Tap the magic wand icon to the left of the blue “Start Live Video” in the center of your screen, and choose if you want to add lenses to your face, change the filter of the camera, or write or draw to make the video more whimsical.
Depending on your version of Facebook mobile, some of your editing and filter options will look like the settings below.
9. Click the blue “Start Live Video” button to start broadcasting.
Once you click it, Facebook will give you a countdown — “3, 2, 1 …” — and then you’ll be live. As soon as you start streaming, your live video will appear in your News Feed — and others’ News Feeds — just like any other post.
10. Interact with viewers and commenters.
To keep your viewers engaged, encourage them to interact with your live video (which will help your ranking in others’ News Feeds). You can also interact with them both by speaking directly to them in your video and, if you want, by having someone else respond to comments from a desktop computer elsewhere.
Where can you see these comments? While you’re broadcasting, you’ll see the time elapsed on the top left along with the number of viewers, and comments will show up live on the bottom of your feed. They’ll appear in reverse chronological order, like on Twitter, so keep in mind that the earlier ones may be farther down.

11. Click “Finish” to end the broadcast.
Once you do this, the video will stay on your Timeline or Page like any other video post.
12. Post your reply and save the video to your camera roll.
Once you finish your broadcast, you’ll be met with a screen similar to the one I’ve screenshot below. If you want to post it, that will enable others to view your video once you’ve stopped broadcasting. Then, tap the download button to save the video to your camera roll so you have a copy of the original for safekeeping.

